

Day 1 Blog
Although there are plenty of different types of epoxy floors. The focus of this week’s blog will revolve around industrial epoxy floors. In Elite Crete Systems terms, this is referred to as the HERMETIC™ Neat Flooring System. This system is a high build, self-leveling, clear or pigmented resinous flooring system engineered for industrial applications. The system is intended for floors subject to medium to high traffic, forklift and rubber wheel carts. The HERMETIC™ Neat Flooring System creates a very durable finish that is easy to clean and maintain while proving resistance to wear abrasion, petrochemicals and contaminants. The benefits of this flooring system include
- Ease of maintenance
- Protects the substrate
- Aesthetic improvements
- Increases the strength of the substrate
- Hard and abrasion resistant
- VOC free – CA 01350 air quality compliant
- Stain and chemical resistant
- Anti-microbial
- Meets or exceeds ADA, USDA & NFPA ‘COF’ requirements
 HERMETIC™ Neat Flooring System done by Gallegos Flooring.
Along with these advantages, a few of the customizable options include:
- Satin or gloss finish
- Fast set available for quicker turnaround time
- Electrostatic dissipative finish is optional
- 20 standard colors with optional custom colors
- Vapor Barrier available for concrete slabs that have been exposed to moisture that may need added protection to prevent water migration up into the epoxy
Typical areas where we recommend installing these floor types include:
- Warehouses
- Manufacturing areas
- Laboratories & clean rooms
- Automobile service areas & garages
- Exhibition halls
- Medical & educational facilities
- Aircraft hangars
This look at first glance seems like it might be the simplest look and most simple application there is when it comes to epoxy floors, but it is actually one of the more challenging applications. Throughout this week, we are going to break down each day of work typically put in for these types of applications and the different ways each layer can be customized to meet whatever needs you may have installing each project you are on.
Day 2 Blog
Prep Work:
The majority of failures that occur with epoxy products happen because of a failure to prep. As the old saying goes, we don’t prep to fail, we fail to prep, and with that, I want to stress the importance in needing to prep the floor before applying a Hermetic™ Neat Flooring System. The prep process is going to require a few things that luckily, we also carry at ECSSETX.
The first process is going to include clearing any debris, other type of flooring (carpet, wood, etc) to where we are just looking at a concrete slab and whatever condition the slab is currently in.
The next process will be grinding the floor. The reason we want to grind the floor before laying down our epoxy floor system is because we want to “open the floor up” or open up the pores of the concrete on the surface to allow the epoxy to penetrate to concrete and bond to the floor. A couple more reasons we grind the floor first are to expose any cracks that would not be seen without grinding floor along with aiding in the cleaning process of the concrete. There is no way to shortcut this process and doing this the correct way eliminates many potential headaches down the road. There is a big range of types of grinders that will run anywhere from a couple hundred dollars to several thousand dollars, but you pay for what you get. On the lower end of the costs, there are small hand grinders that require someone to manually grind the floor. The upfront cost may be low, but with these, the time required to grind the floor is significantly higher. For example, with the Metabo 7” hand grinder that ECSSETX offers, a 2-car garage floor would take 5 hours to grind.

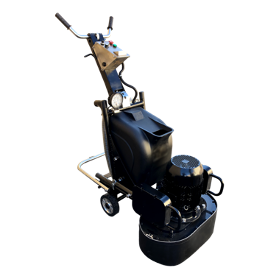
Looking at the other end of the spectrum, ECSSETX also has grinder that cost several thousand dollars, but this machine will grind the floor with someone walking behind it and takes 2 hours to grind a 2-car garage floor.
The scope of your business will probably dictate what investment you want to make into your prep equipment. Scope of business includes long term versus short term outlook, how long you have been in your business, backlog of work, project size, and current profit margins. Ultimately, purchasing a grinder for your business is an important investment that you have to think about as a business owner and decide which option is the right one for you. At ECSSETX, along with offering many different grinders, we offer rental options for a generator, vacuum, grinder, and trailer along with financing options for established customers. Vacuums for your grinder you purchase will also depend on size and power of the grinder and how fast/how much surface area it is able to grind in a given period of time; the more powerful the grinder, the more powerful the vacuum needed. Ultimately bigger is better in the sense of being a lot faster and ultimately cutting down on labor cost or time which should pay out long term, but it is your decision what investment you want to make in your prep and ECSSETX is here to make sure you have the perfect option for what your business needs to be efficient and successful.
After grinding has been complete, the floor needs to be vacuumed again and cleaned with xylene and a microfiber cloth to ensure all dust particles are cleaned up at least to the best of our ability. Xylene
After this we need to access the concrete slab for any cracks and fill these cracks. ECSSETX offers a few products that can help you with this process. Among these include mixing sand with PT-1 epoxy and filling the cracks, MERCAP-445 which is a crack filler that cures under moist conditions, QUICK CRACK which is a crack filler that is a thicker fluid that cures in an hour. Once the cracks are filled and cured, it is recommended to grind these cracks until they are flush with the slab, vacuum, clean with microfiber cloth and xylene, and then you are ready to go for application which we will cover in the next blog. If you have any questions or interest in buying equipment or seeing what we have available, check out our website or contact us via email or phone call and we can get whatever you need taken care of.
Day 3 Blog:
Has your concrete been exposed to moisture?
Now that we have prepped the floor, and done it the right way, we have eliminated the majority of the problems we could ever come face to face with. We have ultimately created an environment that allows the epoxy to penetrate and bond to the concrete while also eliminating any potential imperfections that could Before continuing we now have to address another important concern. Has the floor ever been exposed to moisture or do we think there is water in the concrete pores that could potentially migrate over time? If the answer is yes, ECSSETX has the solution to your problem or at least a tool to attempt to mitigate this risk. VB-5 is our vapor barrier we use. VB-5 will penetrate the concrete and ultimately create a seal that blocks any water migration in the future. The product’s properties create a higher required hydrostatic pressure for the water to overcome to migrate up to the surface of the concrete and into the epoxy. Therefore, VB-5 is a good insurance policy to install. Typically, concrete slabs already have a vapor barrier in them, so for newer slabs, VB-5 is not necessarily needed. However, when dealing with older slabs or environments that have been rigorously exposed to moisture, this product is a good insurance policy and risk mitigation tool to prevent costly problems in the future. VB-5 covers 300 squared ft/gallon and is a 1:1 ratio with part A to part B. Its ability to withstand higher water capillary pressure does come with a cost though. The cost is the reaction/working time with the product. Ways to mitigate this are to pour product on floor after mixing for 2 minutes and then rolling it out versus leaving it in the bucket, putting 2 pints of cold water for every 1 gallon of VB-5 when you are mixing and about to pour it out. This cools down the product and slows the reaction down creating a longer work time for the product. These instructions are also on the label for the product. VB-5 takes 4-5 hours to cure and after this time, you are ready to apply epoxy to the ground.
Day 4 Blog:
Application of Epoxy Coat:
Prep work is done. Insurance policy for moisture is applied. It is now time to move onto the application of the epoxy flooring system. After applying the VB-5, there is a 24-hour window recoat period where the epoxy should be applied on top of the vapor barrier. Although this may look like a simple process especially with it being one solid color across an entire area of floor, the application can be tedious. The goal is to have this coat as level and uniform as possible; there are two ways to go about this. The first way is to do a sacrificial coat of epoxy followed by another coat to ensure uniform coverage of the final coat and give you a guarantee that the floor will be level. In this scenario, coverage for the epoxy will be 150 squared feet/gallon. The second way to go about this is to just do one coat, applied thicker, and allow it to self-level, but the key here is to not short yourself on product. The coverage for this application will be 100-120 squared feet/gallon. Depending on the products you have will dictate how the epoxy will be mixed to get the color schemes needed. We offer PT-4 which is already colored epoxy; there are 15 colors currently available that can be used. If you already have plenty of PT-1 clear epoxy in stock, there is liquid pigments that can be added by substituting 1 quart of the liquid pigment for 1 quart of the Part A epoxy mixture. One quart is enough to pigment a 3-gallon kit. The liquid pigment needs to be mixed with the part A before mixing with the part B of the epoxy. Why? Because we want to ensure a thorough, consistent color before introducing the reaction that causes the epoxy to harden up. Our epoxy is 100% solids and is a 2-part system with a part A and a part B. The ratio is 2-part A’s to 1-part B. For example, in a 3-gallon kit, 2 gallons will be part A and 1 gallon will be part B. Our epoxy systems can be mixed at any volumes, BUT must maintain the 2:1 ratio. After the part A has been mixed with the part B for 2 minutes and mixed thoroughly, the best way to apply the epoxy is to pour on area and squeegee out the epoxy across the area the product is being applied to. After this, it is recommended to back roll the epoxy once. Throughout this process, the working time for the epoxy is 20-25 minutes at 70 degrees, so it is important not to bite off too much of an area that the crew working cannot handle. It is also important to try and cool the epoxy off (if possible) before applying to give more working time. Why? Because if the epoxy has been sitting in a truck that is 100 degrees and it is popped open), the working time could actually be shorter than 20-25 minutes. That is something important to also keep in mind. After your epoxy coat is applied, there is a 24 hour recoat period to apply the top coat sealer, and set time before being able to apply the top coat is 8 hours at 70 degrees. If there is a time sensitivity, we also offer a PTF Part B for the epoxy that causes the epoxy to set faster, and in this case, the set time before being able to apply the top coat is 4 hours at 70 degrees. Cure time for being able to handle traffic on top of the epoxy is 24 hours for normal part B and 12 hours for PTF part B. After this, we are ready to apply the top coat and finish up our industrial epoxy floor!